Preparing the device with the Snowball Edge CLI – Configuring an AWS Snowcone Device to Be an IOT Gateway-2
Step 5 – Creating a virtual network interface
Before we launch our EC2 instance to host the AWS IoT Greengrass v2 agent, we should create a Virtual Network Interface (VNI) as follows. Replace your_ip and your_netmask with appropriate values for your network:
snowballEdge create-virtual-network-interface \
–physical-network-interface-id your_pni_id \
–ip-address-assignment STATIC \
–static-ip-address-configuration IpAddress=your_ip,Netmask=your_netmask
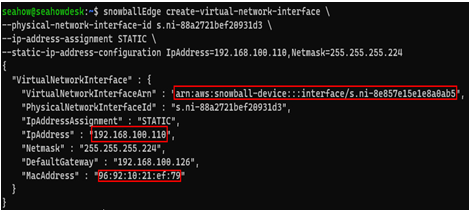
In the next example, we’ve chosen to create a VNI with a static IP assigned to it. VNIs are created separately from EC2 instances because they can be detached/reattached as you launch and terminate instances. Copy the VirtualNetworkInterfaceArn value as you will need it in subsequent steps:

Figure 12.25 – Output from the create-virtual-network-interface command
Step 6 – Obtaining local credentials from your Snow device
We can use the standard AWS CLI client for EC2 instance operations on a Snow Family device, but we must first obtain a special set of local credentials from the device.
First, use the list-access-keys command:
snowballEdge list-access-keys
Using the output of the list-access-keys command, issue the get-secret-access-key command:
snowballEdge get-secret-access-key –access-key-id your_key
The following figure shows an example of this:

Figure 12.26 – Obtaining local device credentials
You can copy all three lines that this command issues into your ~/.aws/credentials file. This will create a profile called snowballEdge. Alternatively, you can run the aws configure command to create the profile interactively:
aws configure –profile snowballEdge
Regardless of the method chosen, you should set the default region to snow.
Step 7 – Retrieving the certificate from your Snow device
Now, we need to download the Snow Family device’s certificate. This is how we make sure any commands we issue with the AWS CLI are encrypted in flight.
First, use the list-certificates command. Copy the ARN of the certificate from the output:
snowballEdge list-certificates
Second, use the get-certificate command with the ARN you just copied and redirect its output to a file called ca-bundle.pem:
snowballEdge get-certificate –certificate-arn your_arn > ca-bundle.pem
Finally, configure the snowballEdge profile you created in the AWS CLI to always use this certificate:
aws configure set profile.snowballEdge.ca_bundle ./ca-bundle.pem
The following figure shows an example of this process:

Figure 12.27 – Configuring the snowballEdge profile in AWS CLI to use the device’s certificate
Step 8 (optional) – Adding the EC2 endpoint URL to your AWS CLI config file
This step is optional but recommended as it saves you from needing to remember to tell AWS CLI commands what the endpoint IP address is every time you use a command against your Snow Family device.
Using your favorite text editor (such as vi or nano), open your AWS CLI config file (usually ~/.aws/config) and make sure your snowballEdge profile section looks like this:
[profile snowballEdge]
ca_bundle = ./ca-bundle.pem
region = snow
services = snowballEdge
[services snowballEdge]
ec2 =
endpoint_url = https://your_snow_ip:8243
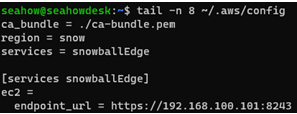
Notice the last five lines. There is a services = snowballEdge reference under the profile pointing to a separate section that actually contains the IPs for your endpoint definitions:

Figure 12.28 – AWS CLI config file with EC2 endpoint address specified
We are now ready to run AWS CLI commands against the Snow device for EC2 instance operations.