Configuring AWS IoT Greengrass on the Snow device – Configuring an AWS Snowcone Device to Be an IOT Gateway
The AWS IoT Greengrass agent can technically run from any computer. It doesn’t matter if it’s a physical or virtual machine, and Greengrass supports a wide range of operating systems. That said, for this exercise, we will be using the AWS IoT Greengrass-validated AMI that you selected to be installed when you ordered the device.
Step 1 – Creating an EC2 keypair on the Snow device
The very first task before launching any EC2 instance is to create a key pair. In this case, we will do it from the CLI and output its contents to a local file. We also want to set the permissions to 600 on the my-keypair.pem file or SSH will fail later:
aws ec2 create-key-pair \
–key-name my-keypair \
–key-type rsa \
–key-format pem \
–query “KeyMaterial” \
–output text > my-keypair.pem \
–profile snowballEdge
chmod 600 my-keypair.pem
Step 2 – Obtaining the ImageId value from your Snow device
Next, we need to know the ImageId value of the AWS IoT Greengrass-validated AMI on our Snow family device to be able to launch it. This can be obtained with the AWS CLI using the describe-images command for our snowballEdge profile:
aws ec2 describe-images –profile snowballEdge
Copy the ImageId value from the appropriate AMI, as shown in the following figure:

Figure 12.29 – Using the AWS CLI to describe available AMIs on a Snow Family device
Step 3 – Launching the EC2 instance on your Snow device
Launch the AWS IoT Greengrass-validated AMI using the ImageId value from step 1:
aws ec2 run-instances \
–image-id your_image \
–key-name my-keypair \
–profile snowballEdge
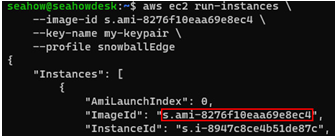
Copy the InstanceId value from the output, as highlighted in the next figure:

Figure 12.30 – Launching an EC2 instance on a Snow Family device
Step 4 – Attaching the VNI to your EC2 instance
Attach the VNI with a static IP that you created earlier to this newly running instance:
aws ec2 associate-address \
–instance-id your_id \
–public-ip your_ip \
–profile snowballEdge
It might seem strange telling it to use a public IP, but remember – in the context of Snow Family devices, public IPs are on your local network (which may well be private):

Figure 12.31 – Associating a VNI with an EC2 instance
Step 5 – SSHing into your EC2 instance
Now, you are ready to SSH into the EC2 instance running on your Snow Family device:
ssh -i ./my-keypair.pem [email protected]
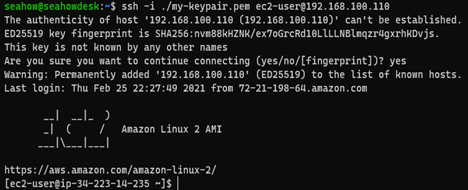
You will be asked whether to add this host to the list of known hosts, as shown in the next figure. Answer yes, and you will be connected:

Figure 12.32 – Connecting to the AWS IoT Greengrass EC2 instance on a Snow Family device
Step 6 – Installing the AWS IoT Greengrass prerequisites into your EC2 instance
The following command string will install the prerequisites needed to run the AWS IoT Greengrass v2 agent. These include AWS CLI v2, Python 3, and Java 8:
curl “https://awscli.amazonaws.com/awscli-exe-linux-x86_64.zip” \
-o “awscliv2.zip” && \
unzip awscliv2.zip && \
sudo ./aws/install && \
sudo yum -y install python3 java-1.8.0-openjdk
Grant the root user permission to run the AWS IoT Greengrass v2 agent:
sudo sed -in ‘s/root\tALL=(ALL)/root\tALL=(ALL:ALL)/’ /etc/sudoers
Step 7 – Installing the AWS IoT Greengrass v2 agent onto your EC2 instance
Download the AWS IoT Greengrass v2 agent software:
curl -s https://d2s8p88vqu9w66.cloudfront.net/releases/greengrass-nucleus-latest.zip > greengrass-nucleus-latest.zip
unzip greengrass-nucleus-latest.zip -d GreengrassCore
rm greengrass-nucleus-latest.zip
Temporarily grant the AWS CLI credentials to your AWS account.
Note – do not use the credentials you obtained from the Snow device
Use the same credentials you used to deploy the CloudFormation templates containing the backend components.
Replace your_key, your_secret_key, and your_region as appropriate in the following commands:
export AWS_ACCESS_KEY_ID=your_key
export AWS_SECRET_ACCESS_KEY=your_secret_key
export AWS_REGION=your_region
Now, we need to retrieve some values from the backend components we deployed earlier, as they are dynamically named:
export DEVICEPOLICY=$(aws iot list-policies \
–query ‘policies[?starts_with(policyName, `greengrass-device-default-policy`) == `true`].policyName’ \
–output text)
export TOKENEXCHANGEROLE=$(aws iam list-roles \
–query ‘Roles[?starts_with(RoleName, `greengrass-token-exchange-role`) == `true`].RoleName’ \
–output text)
export TOKENEXCHANGEROLEALIAS=”$TOKENEXCHANGEROLE-alias”
export GGC_THING_NAME=”mysnowcone”
export GGC_THING_GROUP=$(aws iot list-thing-groups \
–query ‘thingGroups[?starts_with(groupName, `thing-group-`) == `true`].groupName’ \
–output text)
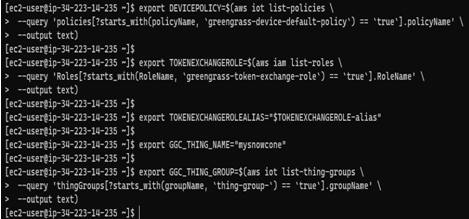
Exporting key variables prior to running the AWS IoT Greengrass v2 installer:

Figure 12.33 – Exporting key variables
Now, we’re ready to execute the AWS IoT Greengrass v2 installer:
sudo -E java -Droot=”/greengrass/v2″ -Dlog.store=FILE \
-jar ./GreengrassCore/lib/Greengrass.jar \
–aws-region $AWS_REGION \
–thing-name $GGC_THING_NAME \
–thing-group-name $GGC_THING_GROUP \
–thing-policy-name $DEVICEPOLICY \
–tes-role-name $TOKENEXCHANGEROLE \
–tes-role-alias-name $TOKENEXCHANGEROLEALIAS \
–component-default-user ggc_user:ggc_group \
–provision true \
–setup-system-service true \
–deploy-dev-tools true
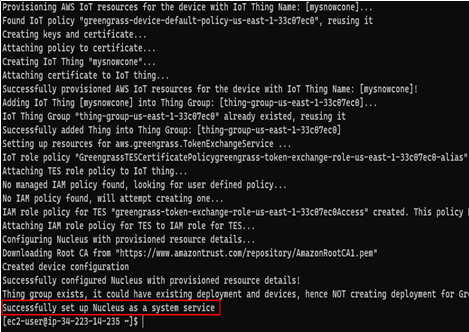
An example of what the output should look like is shown in the next figure:

Figure 12.34 – Successful installation of the AWS IoT Greengrass v2 agent
You are now finished with the configuration of the Snow Family device itself. Disconnect your SSH session.